![]()
![]()
![]()
![]()
![]()
![]()
![]()
![]()
![]()
![]()
![]()
![]()
![]()
![]()

|
Last updated |


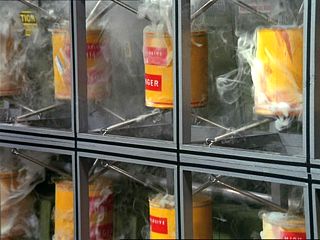 |
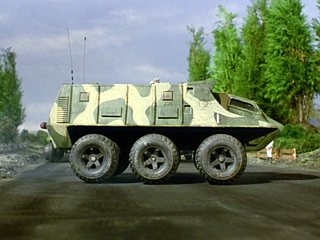
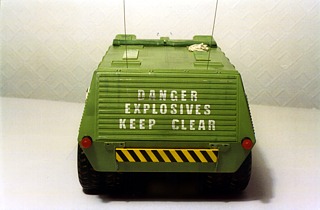
Whenever I think of Joe 90 my first thought is of a row of smoking containers marked High Explosive - Danger bouncing up and down on support springs. This scene is from the episode Colonel McClaine in which our hero drives one of three trucks, over 200 miles of dangerous terrain, to transport 150 litres of highly unstable U114 explosive to Kuchunga. This episode is my favourite of the series and also features my favourite guest vehicle that is simply known as the Explosives Truck. |
|
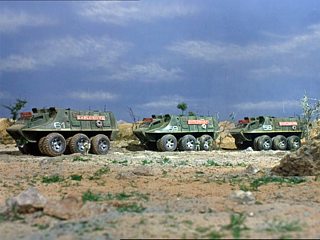
Like many vehicles in this series it was designed by Mike Trim and is notable for the fact that it is seen as the prototype for the popular SHADO Mobile from Gerry Anderson’s later series UFO. For this episode four models had to be built: truck 61 driven by Joe, truck 59 driven by ‘Sarge’, truck 58 operated by the reluctant Private Johnson and finally a less detailed dummy model built for an explosion SFX shot. |
 |
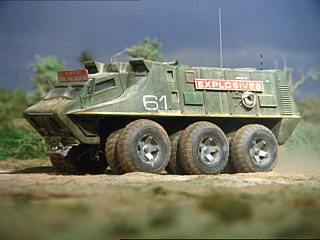 |
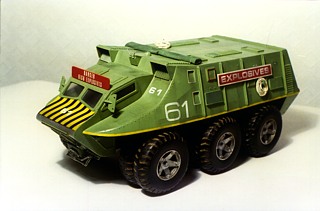
The three hero models were very similar to each other with only a few minor differences, one being that Joe’s truck had a door cut into the left hand side of the driver’s cabin (probably for a shot that was deleted from the final script). The other differences were caused by the physical knocks the models received during filming which resulted in a number of the glued on kit parts dropping off the models, most notably on the sides and the front ‘chin’ section. |
| Although scenes can be filmed in any order it is probably fair to say that most of the major SFX sequences were filmed in script order, as the models start out in good condition and at the end look pretty well beaten up. Also, after the shots featuring all three trucks had been completed, ‘Sarge’s’ number 59 truck was outfitted with 61 markings which would have allowed a second SFX unit to film additional shots of Joe’s vehicle to ensure the episode was finished on time. |
 |
 |
After the episode was completed the three models were added to the model store and made further screen appearances in later shows. Private Johnson’s truck 58 appeared in The Race minus its signage and with khaki camouflage markings simply painted over its old dirty green finish. |
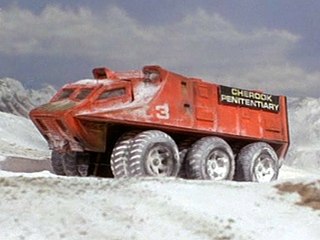
| Most notably Joe’s number 61 model appeared in the episode Breakout. Here it was painted red, had ‘Cherook Penitentiary 3’ markings and a modified rear end, involving the removal of about an inch of its length and a flat rear bulkhead fitted with twin doors. |
 |
 |
Truck 59, still sporting 61 markings and with the addition of a flashing light on the drivers cabin, made its final appearance in The Secret Service episode School For Spies where it was blown up half a dozen times and then left to burn. |
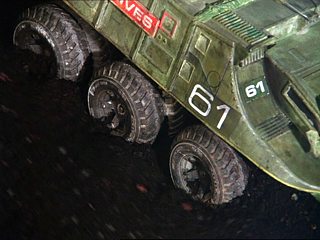
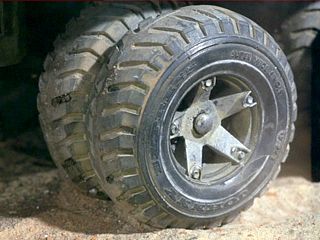
| I’ve wanted to build a replica of this model for many years but was always put off by the fact that I could never find the wheels that were used on the original. The toy wheels and tracks used on the Mobile and SPV models have been identified for a while now but these chunky wheels that also appear on models in Captain Scarlet and The Mysterons and UFO never have been — even with the words 'Johnny Express Super Wide' written around the edge*. Mike Trim remembers the models making a loud noise as they rolled over the roadways and thinks the wheels may have been castings taken off a wheel they had found somewhere. |
 |
After searching toy fairs for years I finally gave in and realised that I was going to have to scratch build them after all. The first problem was to figure out how big the original model was and draw up a blueprint. Normally I only start a model when I have a lot of photographic reference material including the all important profile pictures. Unfortunately I only had a couple of publicity photos, which was completely inadequate, but the models were featured heavily in the episodes and are filmed from every angle, and as they are also covered in around sixty model kit parts (which are still available) it was possible to complete the project.
 |
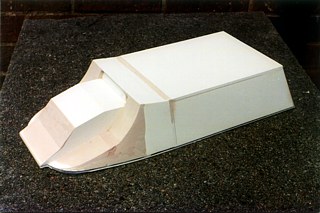
I decided to make the model in fibreglass so the master pattern was made in three sections: the upper hull and the lower front and rear pieces. As the vehicle is almost entirely made up of flat panels I fabricated it all in plasticard and Perspex sheeting. |
|
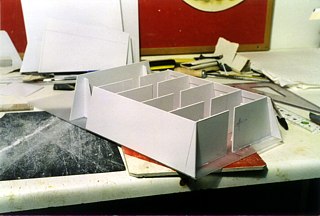
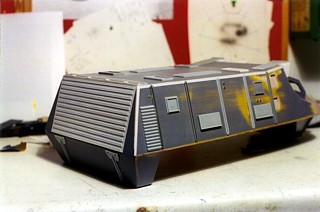
This picture shows the completed hull with the curved areas built up in car filler. Although the shape looks simple and quick to build it did require a lot of alterations. Every time I completed the shape I compared it to freeze frame images on my television, marked any area that didn’t look correct and then broke the model down and rebuilt it. |
 |
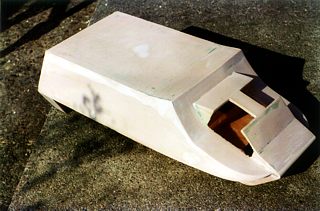 |
This is the fibreglass shell produced from plaster moulds taken from the plastic masters. I decided that my model would deviate from the originals by having two door/hatches in the cabin — to me this looked more realistic and made access to the interior a lot easier. |
|
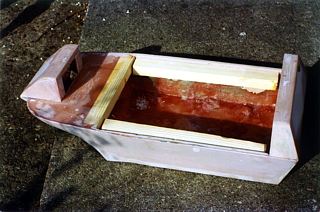
Lengths of hardwood were fixed to the inner edges of the hull onto which a 4mm Perspex plate was screwed that the chassis could then be glued to. The front third had to be blanked off before the lower cabin could be attached; this was done by simply gluing the hull to a flat glossy surface and pouring resin in through the open cabin doors. |
 |
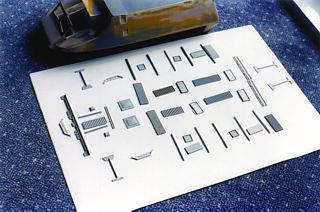 |
These are some of the kit parts needed to detail the outer surface of the model. They come from three old Airfix kits that are now made by a company called Dapol: The Girder Bridge, the Signal Gantry and the Foot Bridge. |
|
Apart from the kit parts, the hull was detailed with Letraline tapes as well as small panels and ribbing cut from self adhesive paper. The rivet detail was simulated using various sized pins inserted into holes drilled into the surface of the model. I did start using pins for the rivets around the windows, but even the smallest was too big, so I just resorted to drilling shallow holes. The cabin doors and interior detail was created using plasticard and a few kit parts. |
  |
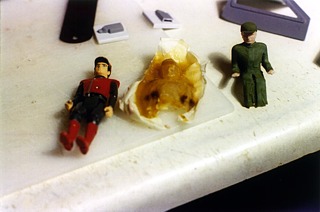 |
I didn’t want a little Joe figure in the cabin so I hunted around for an adult figure I could use. A cheap Captain Scarlet figure I picked up from a toy fair was about right, and even had the correct hat, so I covered the head and torso in about ten layers of quick drying latex and took a partial cast from which I could create my driver. He didn’t have to be complete because you can only see the top part of him through the windows. Then I decided to degrade the inside of the windows to stop the model looking like a toy, so now you can barely see him at all. |
|
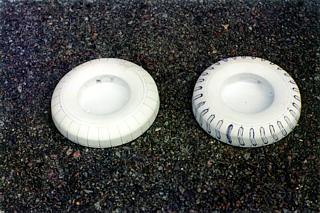
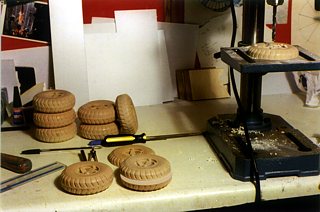
In order to make the wheels I had to scratch build one complete wheel in two separate halves and then mould them. Construction of each half started with a plastic disc that represented the middle of the wheel and a section of plastic tube to represent the hub. The shape of the tyre was then sculpted onto this using car filler. The hub was then removed and a layer of plastic was vac-formed around the tyre creating an outer skin onto which the thirty tread patterns could be drawn and then cut out. A new piece of plastic tube was glued into the centre and the hub detail was now scratch built out of plasticard, modified kit parts and more filler. |
 |
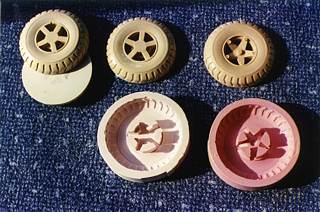 |
I bought a small can of silicon rubber from a local hobby shop, made moulds of the two wheel halves and then cast up the twenty four halves I required. This was a very smelly and messy job and it was at this stage that any thought of making all three trucks went out of the window. |
|
Each half casting had to be sanded flat and then paired off to create a whole wheel, a process complicated by the fact that the thickness of each piece was slightly uneven. These small differences wouldn’t normally be noticeable but with the wheels being so big in relation to the rest of the model and also being fixed together in pairs it could have created a problem. So I had to gauge the thickness of each half and find the fattest and thinnest parts, and then glue the pieces together so that the variations would counteract each other and create a balanced wheel. Then there was also the problem that the casting process generated some heat, causing the rubber moulds to warm up and expand, which resulted in creating slightly bigger wheels. Luckily I had made more castings than I required so the spares came in handy. The wheels were glued together and fixed onto brass tube axles that ride on supports in the chassis, cushioned by pieces of foam to create a soft adjustable suspension. |
 |
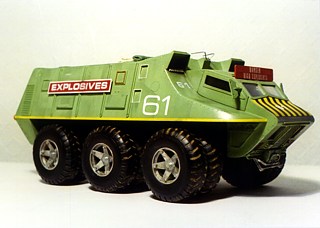 |
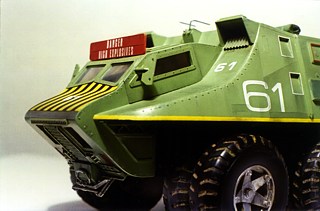
The finished model was painted with acrylic motorcar spray paints and detailed with coloured Letraset flex tapes. Panel lines were drawn in with a biro and the weathering was added using black graphite pencil and various enamel paints, which was all sealed on with clear acrylic lacquer. |
| The white lettering was a bit of a pain as I didn’t have the correct Letraset for the large numbers and the words on the rear panel, so these had to be carefully done using masking tapes during the initial painting stage. The model was painted with white undercoat, then the letters (photocopied onto adhesive paper) were stuck in position while the model was sprayed green, and then removed. Any green paint that had managed to get under the edges of the paper was either removed or over painted later. |
 |
 |
Finally the rolls of green canvas on the roof were made from bits of fabric (cut from an old pair of jeans) with Letraset tape representing the straps. |
| When I started this project I thought it was going to be a fairly simple and easy model to construct, but it took a lot more effort than expected. It amazes me even more that the model makers at the studio managed to produce four models in such a short space of time for the episode — and they didn’t even have superglue. |
 |
*Webmaster's note: thanks to the internet, we now know that the elusive wheels originally came from one of the mid-60s 'Johnny Express' line of commercial truck toys made by US company Topper Toys. However as David suggests, it seems the wheels used on the models in the episode were cast from an original and then modified to make them narrower.
(Text and photographs © 2005 David Sisson)